


WordPress Settings: Complete Beginner’s Guide
The WordPress Settings section controls the basic behavior of your website. From here, you can configure your site information, writing and reading preferences, comments, media sizes, website URLs, privacy settings, and external service connections.
This guide explains the main settings available in current WordPress, including the newer Connectors section. WordPress 7.1 is the current release as of September 2026, so some options may look different depending on your WordPress version, theme, plugins, or hosting setup.
Already installed WordPress? If not, first learn [How to Install WordPress in Hostinger] before configuring these settings.
To open these options, go to:
WordPress Dashboard → Settings
You will find sections such as General, Connectors, Writing, Reading, Discussion, Media, Permalinks, and Privacy.
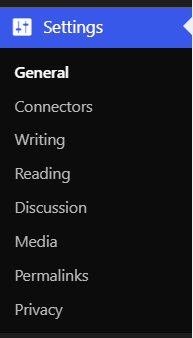
1. General Settings
General Settings contain the basic information and settings of your website. They control your site name, URLs, email address, language, timezone, and date and time formats.
Site Title
The Site Title is the name of your website.
For example:
Perfect Guide
WordPress and many themes use this name in different places, including the browser title and website header.
What to do: Enter your actual website or brand name.
Tagline
The Tagline is a short description explaining what your website is about.
For example:
Simple guides for websites and digital marketing
Keep it short and relevant to your website.
WordPress Address (URL)
This is the URL where your WordPress core files are installed.
For most websites, it will look like:
Important: Do not change this URL unless you know exactly what you are doing, because an incorrect URL can make your website inaccessible.
Site Address (URL)
This is the URL visitors use to open your website.
For a normal WordPress installation, the WordPress Address and Site Address are usually the same.
Administration Email Address
This is the main email address WordPress uses for important website notifications.
Use an email address that you regularly check.
Membership
This option allows visitors to register accounts on your website.
For a normal blog: Leave it disabled unless you need user registration.
New User Default Role
If visitors can register, this setting determines the role automatically given to new users.
For most websites, Subscriber is the safest default role.
Site Language
Choose the language you want to use in your WordPress dashboard and WordPress interface.
Timezone
Choose the timezone that matches your location.
For an India-based website, select the appropriate India/UTC+5:30 timezone option.
Date Format and Time Format
These settings control how dates and times are displayed on your website.
Choose the format that is easiest for your visitors to understand.
Week Starts On
This determines which day appears as the first day of the week in WordPress calendars.
Choose Monday if that matches your preference.
You can also check the official WordPress General Settings documentation for more information about these options.
2. Connectors
Connectors is a newer WordPress Settings section that allows your website to connect with external services. Current WordPress documentation lists featured connectors for Anthropic, Google, and OpenAI.
These connections are mainly useful for websites using WordPress’s newer AI-related features.
Install a Connector
You can install the plugin associated with a supported service and then connect your website to that service.
After installation, you may need to provide an API key from the service provider.
API Key
An API key is a credential that allows WordPress to communicate with an external service.
Important: Treat API keys like passwords. Do not share them publicly.
AI Features
WordPress can use configured AI connectors with its AI features. Depending on the setup, these features can help with tasks such as generating featured images, alt text, titles, excerpts, and other content.
For beginners: If you are not using WordPress AI features, you do not need to configure Connectors.
3. Writing Settings
Writing Settings control some default options related to creating posts.
Default Post Category
This determines the category automatically assigned to a new post when you do not select another category.
For example, you can create a category called Blog and use it as your default category.
Default Post Format
This controls the default format used for new posts when your theme supports different post formats.
Most modern websites simply use the standard Post format.
Other Writing Options
Depending on your WordPress installation and available features, additional writing-related options may appear.
For a normal blog, you usually do not need to change these settings.
Tip: Your main writing and editing work is done in the WordPress post editor. Writing Settings mainly control defaults.
4. Reading Settings
Reading Settings control how visitors see your website’s homepage and blog posts.
Your Homepage Displays
You can normally choose between:
- Your latest posts
- A static page
Your Latest Posts
Choose this if you want your homepage to automatically display your newest blog posts.
This is suitable for a simple blog.
A Static Page
Choose this if you want a specific page to act as your homepage.
For example:
Home → About → Services → Blog
You can select a separate page for your blog posts.
This is usually the better choice for a business or professional website.
Blog Pages Show at Most
This controls how many posts WordPress displays on a blog page.
For example, you might display 10 posts at a time.
Syndication Feeds
These settings control how many posts are included in your site’s RSS feed and whether the feed displays the full text or only an excerpt.
Search Engine Visibility
This option asks search engines not to index your website.
Important: Do not enable this on a live website if you want your content to appear in Google and other search engines.
It can be useful while developing a website, but should normally be disabled when your site is ready to be public.
WordPress also uses this setting in its Site Health information to indicate whether the site is discouraging search engines.
5. Discussion Settings
Discussion Settings control comments and other interactions on your posts. WordPress lets you decide whether comments are allowed, how they are moderated, and when you receive notifications.
Default Post Settings
You can control whether WordPress:
- Attempts to notify websites that you link to
- Allows pingbacks and trackbacks
- Allows visitors to comment on new posts
For most blogs, keeping comments enabled is useful if you want readers to interact with your content.
Other Comment Settings
These settings include options such as:
- Requiring the commenter to enter a name and email
- Requiring users to register before commenting
- Automatically closing comments on older posts
- Showing a cookies opt-in option
- Enabling threaded or nested comments
Recommended: Allow normal visitors to comment without requiring registration, and keep threaded comments enabled if you want conversations under your posts.
Comment Pagination
If you receive many comments, you can divide them into multiple pages.
You can choose:
- Number of comments per page
- Which comment page opens first
- Whether older or newer comments appear first
Email Me Whenever
WordPress can notify you when:
- Someone posts a comment
- A comment is waiting for moderation
- Other supported activities occur
Keeping comment notifications enabled makes it easier to manage your website.
Before a Comment Appears
You can choose whether comments need to be manually approved before appearing publicly.
For a new blog, manual approval is a good option because it gives you more control over spam and unwanted comments.
Comment Moderation
You can ask WordPress to hold comments containing a certain number of links or specific words, URLs, email addresses, or IP addresses.
Disallowed Comment Keys
You can add words, phrases, URLs, or IP addresses that should cause matching comments to be sent directly to the Trash.
Avatars
Avatars are small profile images shown beside comments.
You can control:
- Whether avatars are displayed
- Maximum avatar rating
- Default avatar
For a general website, the G rating is a simple choice.
6. Media Settings
Media Settings control some default image sizes that WordPress uses when uploading images. WordPress documentation describes this section as controlling settings related to images and other media used in posts and pages.
Thumbnail Size
This controls the default dimensions used for thumbnail images.
Medium Size
This controls the maximum dimensions used for medium-sized images.
Large Size
This controls the maximum dimensions used for large images.
WordPress can create different image sizes from one uploaded image so that an appropriate version can be used in different parts of your website.
What should you do?
For most beginners, the default values are fine.
Avoid changing these settings without a specific reason, especially if your theme already handles image sizes correctly.
7. Permalink Settings
Permalinks are the permanent URLs of your posts and pages.
For example:
Less readable:
example.com/?p=123
More readable:
example.com/wordpress-settings/
WordPress provides several permalink structures, including Plain, Day and name, Month and name, Numeric, Post name, and Custom Structure.
Plain
Example:
example.com/?p=123
It uses a post ID instead of a descriptive name.
Day and Name
Example:
example.com/2026/09/14/sample-post/
The URL includes the publication date and post name.
Month and Name
Example:
example.com/2026/09/sample-post/
The URL includes the year, month, and post name.
Numeric
Example:
example.com/archives/123
It uses a numeric post ID.
Post Name
Example:
example.com/sample-post/
This uses the post’s name in the URL.
Recommended for most blogs: Post name
It creates short, readable URLs that are easy for visitors to understand. WordPress also notes that permalink structures can improve the appearance and usability of URLs.
Custom Structure
Advanced users can create their own URL structure using WordPress permalink tags.
Important: If your website is already established, do not change your permalink structure without planning redirects, because existing URLs may stop working.
For more details about URL structures, see the official WordPress Permalink Settings documentation
8. Privacy Settings
Privacy Settings help you choose which page on your website is used as the Privacy Policy page.
A Privacy Policy explains how your website collects, uses, stores, and handles visitors’ information.
Create a Privacy Policy Page
WordPress can help you create a Privacy Policy page using a built-in template.
You can also select an existing page and use it as your Privacy Policy page.
Review Your Privacy Policy
Do not simply publish the automatically generated text and forget about it.
Review the page and update it according to the actual tools and services used on your website, such as:
- Contact forms
- Analytics
- Cookies
- Advertising
- Newsletter services
- Payment services
- Third-party plugins
WordPress provides guidance and suggestions, but you are responsible for keeping your privacy information accurate and up to date.
You can learn more about creating and managing a Privacy Policy from the official WordPress Privacy Settings documentation
Final Checklist for WordPress Settings
Before launching your website, review these sections:
- General: Add your website name, tagline, language, timezone, and email.
- Connectors: Configure only the external or AI services you actually use.
- Writing: Set your default category and other writing defaults.
- Reading: Choose your homepage and check search engine visibility.
- Discussion: Decide how comments and moderation should work.
- Media: Review your default image sizes.
- Permalinks: Use a clear URL structure such as Post name for most new blogs.
- Privacy: Create and review your Privacy Policy page.
Conclusion
The Settings section gives you control over the basic configuration of your WordPress website. General Settings manage your website information and basic preferences, while Writing and Reading Settings control how content is created and displayed. Discussion Settings manage comments, Media Settings control image sizes, Permalink Settings control your URLs, and Privacy Settings help you manage your Privacy Policy.
For beginners, the best approach is not to change every option randomly. Understand what each setting does, configure the options that are relevant to your website, and leave advanced options at their default values when you do not need them.