


WordPress Dashboard: Complete Beginner’s Guide
The WordPress Dashboard is the control center of your website. After logging in to WordPress, you can use the Dashboard to create content, manage media, change your website design, install plugins, manage users, and control important website settings.
The options you see can vary depending on your WordPress version, active theme, user role, and installed plugins. Modern block themes may show options such as Editor instead of the traditional Customizer, Widgets, and Menus screens.
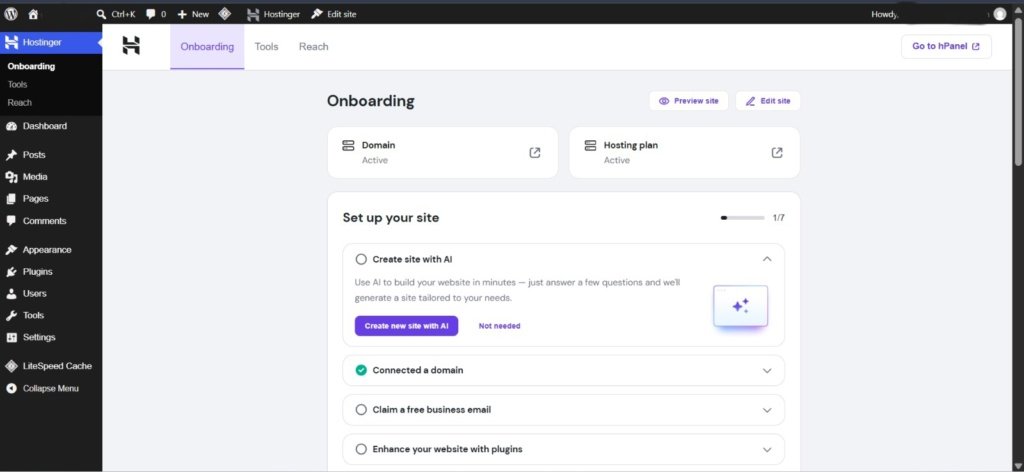
Let’s understand the main WordPress Dashboard options one by one.
1. Posts
Posts are mainly used for regularly published blog content, news, articles, and updates.
From Posts, you can:
- View all your published and draft posts
- Add a new post
- Edit existing posts
- Delete posts
- Assign categories and tags
- Search and filter posts
- Perform actions on multiple posts at once
The Posts screen also provides Quick Edit and Bulk Actions, which make it easier to manage several posts without opening each one individually.
Example
If you write an article called “How to Install WordPress in Hostinger”, it would normally be created as a Post.
2. Pages
Pages are generally used for important website information that does not belong to your regular blog timeline.
Common examples include:
- About Us
- Contact Us
- Privacy Policy
- Terms and Conditions
- Services
You can create, edit, delete, search, and manage Pages from the Pages section. WordPress also allows you to organize pages using parent and child page relationships.
Example
Your About Us page would normally be created under Pages rather than Posts.
3. Categories
Categories help you organize your blog posts into broad topics.
For example, a digital marketing website might have categories such as:
- SEO
- Content Marketing
- Social Media
- WordPress
- Digital Marketing
Categories can also have a parent-child relationship. For example:
Digital Marketing → SEO → Local SEO
This makes your website easier to organize and helps visitors find related content.
Tip: Keep your categories clear and broad instead of creating a separate category for every small topic.
4. Tags
Tags are another way to describe and group your posts.
For example, a post about WordPress SEO might use tags such as:
- WordPress SEO
- SEO Tips
- Website SEO
- Blogging
Unlike categories, tags do not have a hierarchy. They are optional and are mainly useful when they genuinely help organize related content.
Categories vs Tags
Category = broad topic
Tag = specific topic or detail
For example:
Category: WordPress
Tags: WordPress SEO, Plugins, Blogging
5. Media Library
The Media Library stores the files you upload to your WordPress website.
It can contain:
- Images
- Videos
- Audio files
- PDFs
- Other supported media files
You can upload new files, search existing files, edit media information, and delete files from the Media Library.
When editing an image, you may also manage information such as:
- Title
- Caption
- Alternative text (Alt Text)
- Description
SEO Tip
Use meaningful image file names and appropriate Alt Text that describes the image accurately.
6. Appearance
The Appearance area is used to control the visual design and structure of your website.
Depending on your active theme, you may see options such as:
- Themes
- Editor
- Customize
- Widgets
- Menus
The exact options can change with the theme you are using. Modern block themes use the Site Editor, while many classic themes use the Customizer, Widgets, and Menus screens.
6. Themes
A Theme controls the overall design and appearance of your WordPress website.
A theme can control things such as:
- Layout
- Typography
- Colors
- Header
- Footer
- Blog design
- Page structure
From Appearance → Themes, you can view installed themes, activate another theme, add a new theme, and manage available themes.
Important
Only one theme is normally active on your website at a time. Other installed themes remain available but do not control the site’s current appearance.
7. Plugins
Plugins add extra features and functionality to WordPress.
For example, plugins can help you add:
- SEO tools
- Contact forms
- Security features
- Website backups
- Analytics
- Caching
- Social sharing
- E-commerce functionality
From Plugins, you can install, activate, deactivate, update, and delete plugins.
Important Tip
Do not install unnecessary plugins. Too many poorly maintained plugins can make website management more difficult and may create compatibility or security issues.
8. Users
The Users section allows you to manage people who have accounts on your WordPress website.
You can:
- View users
- Add new users
- Edit user information
- Change user roles
- Remove users
- Manage your own profile
WordPress provides different user roles with different levels of access, such as Administrator, Editor, Author, Contributor, and Subscriber.
Example
If you have someone writing articles for your website, you can create a separate user account instead of sharing your administrator login.
9. Tools
The Tools section contains additional WordPress management features.
Depending on your installation, available tools can include options related to:
- Importing content
- Exporting content
- Site Health
- Personal data
- Erasing personal data
The exact tools available can vary depending on your WordPress setup and installed plugins.
Site Health
Site Health can help you identify technical areas that may need attention on your website, such as updates, configuration issues, and recommended improvements.
10. Settings
The Settings section contains important configuration options for your WordPress website.
Depending on your WordPress installation and plugins, you may see options such as:
- General
- Writing
- Reading
- Discussion
- Media
- Permalinks
- Privacy
- Plugin-specific settings
These settings control how your website behaves rather than simply how it looks.
For example, you can configure your site’s title, reading behavior, comments, media settings, URL structure, and privacy-related pages.
Important
Be careful when changing settings, especially Permalinks, because changing URL structures on an established website can affect existing links.
11. Widgets
Widgets are small content or functionality blocks that can be placed in specific areas of a website.
Traditional widget areas may include:
- Sidebar
- Footer
- Header
Examples of widget content include:
- Recent Posts
- Categories
- Search
- Recent Comments
- Custom HTML
However, modern block themes handle many layout elements through the Site Editor instead of the traditional Widgets screen.
12. Menus
Menus help visitors navigate your website.
A navigation menu can contain:
- Pages
- Categories
- Custom links
- Other available content
For example, a simple blog navigation menu might contain:
Home | Blog | About | Contact
Important
On many modern block themes, navigation is managed through the Navigation tools inside the Site Editor rather than the traditional Appearance → Menus screen.
13. Customize
The Customize option, also known as the Customizer, allows you to change various parts of a theme using a visual interface.
Depending on the theme, you may be able to customize:
- Site identity
- Colors
- Typography
- Header
- Footer
- Homepage settings
- Additional CSS
- Other theme-specific options
However, Customize is mainly associated with classic themes. Block themes generally use the Site Editor for site-wide design and customization.
14. Site Editor
The Site Editor is the modern WordPress editing system used with block themes.
It allows you to visually edit much more than an individual page or post.
Depending on the theme, you can work with:
- Templates
- Template Parts
- Header
- Footer
- Navigation
- Styles
- Pages
- Site-wide design
The Site Editor uses blocks, allowing you to build and modify different parts of your website without directly editing code.
Simple Difference
Customizer: Mainly used with classic themes.
Site Editor: Used with block themes for broader site-wide editing.
15. Revisions
Revisions allow you to view previous saved versions of your posts and pages.
For example, suppose you make several changes to an article and later decide that you want an earlier version back. Revisions can help you compare previous versions and restore an earlier version when available.
This is particularly useful when editing important content.
Tip: Before making major changes to an important article or page, checking its available revisions can give you an additional safety option.
16. Trash and Recovery
When you delete a post or page, WordPress can move it to the Trash instead of immediately removing it permanently.
This gives you an opportunity to recover accidentally deleted content.
WordPress documentation states that trashed posts and pages are normally kept for 30 days by default before permanent deletion, unless the site’s configuration changes this behavior.
Basic process
Delete → Trash → Restore
If you accidentally delete something, open the Trash and use the Restore option when available.
17. Screen Options
Screen Options allow you to control which information is displayed on certain WordPress administration screens.
For example, on the Posts screen, you can choose which columns appear in the post list and how many posts are displayed per page.
This is useful when your Dashboard contains more information than you need.
Example
If you do not want to see a particular column in your Posts list, you can use Screen Options to hide it.
18. Quick Edit
Quick Edit allows you to make small changes without opening the complete editor.
For a post, Quick Edit can be used for several details such as:
- Title
- Slug
- Date
- Author
- Categories
- Tags
- Status
- Comments
- Other available post options
This is useful when you need to make a quick change to one item.
Example If you notice a spelling mistake in a post title, you may be able to correct it directly through Quick Edit without opening the full editor.
19. Bulk Actions
Bulk Actions allow you to perform an action on multiple items at the same time.
For example, you can select several posts and perform an available action such as:
- Edit
- Move to Trash
Bulk editing can also allow you to change certain information for multiple selected posts at once.
Example
Suppose you have 10 old posts that need to be moved to the Trash. Instead of opening each post individually, you can select multiple posts and use a Bulk Action.
WordPress Dashboard at a Glance
The WordPress Dashboard brings all these tools together in one administration area.
A simple way to remember the main sections is:
Create Content → Posts & Pages
Organize Content → Categories & Tags
Manage Files → Media Library
Design Website → Themes, Customize & Site Editor
Add Features → Plugins
Manage People → Users
To Manage Website → Tools & Settings
Manage Content Efficiently → Quick Edit & Bulk Actions
Final Thoughts
The WordPress Dashboard gives you everything you need to create, manage, and customize your website. Once you understand these basic sections, working with WordPress becomes much easier.
If you are new to WordPress, check our guides on [how to install WordPress in Hostinger], [WordPress Dashboard], and [WordPress Settings] to learn the next steps.